Here you’ll learn how you can do basic configuration of a Board.
Related: Learn how you can Add a Board.
1. Open the Board you wish to configure
You can see the list of your Boards in the top left corner of your screen. Access the necessary Board by simply clicking on it.
![]()
2. Click the gear icon in the footer
Open the Board settings menu by clicking the ![]() icon at the bottom of the page.
icon at the bottom of the page.

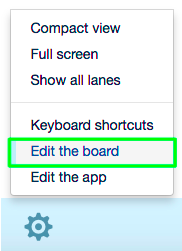
3. In the context menu, select “Edit the board”
Alternatively, you can click Shift + B on your keyboard.
4. In the window that will open, under the “Options” tab, start editing the Board

4.1. Board Title
In this field you can rename the Board. In order to do that, double-click the current title, and then type the new one, and press “Enter” on your keyboard.

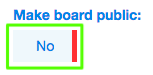
4.2. Make Board public
In this field you can switch between “Yes”/”No”, in order to make the Board public/private respectively.
4.3. Show Task IDs
In this field you can switch between “Yes”/”No”, in order to enable/disable showing task IDs respectively.

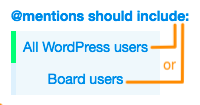
4.4. @mentions should include
Select whether @mentions should include All WordPress users or Board users by clicking on the respective option.
4.5. Only the user who created a card can delete it
In this field you can switch between “Yes”/”No”, in order to enable/disable the feature according to which only the user who created a card can delete it.

Related: Learn more about Cards.
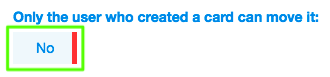
4.6. Only the user who created a card can move it
In this field you can switch between “Yes”/”No”, in order to enable/disable the feature according to which only the user who created a card can move it.
Related: Learn how you can manage Boards and Board elements: